
A mini split is one of the best ways to heat and cool a mobile home — quiet, efficient, and free of the leaky belly ductwork that plagues older units. But the shape of a single-wide works against it. A long, narrow floor plan is essentially a tunnel, and a single head mounted in the middle of the living room will freeze that room while the bedrooms at the far end stay stuffy. Getting placement and zoning right is what separates a mini split that delights from one that disappoints. This guide covers where the heads go, how many you need, and the mounting details that make airflow reach the ends.
Why a narrow floor plan is the hard part
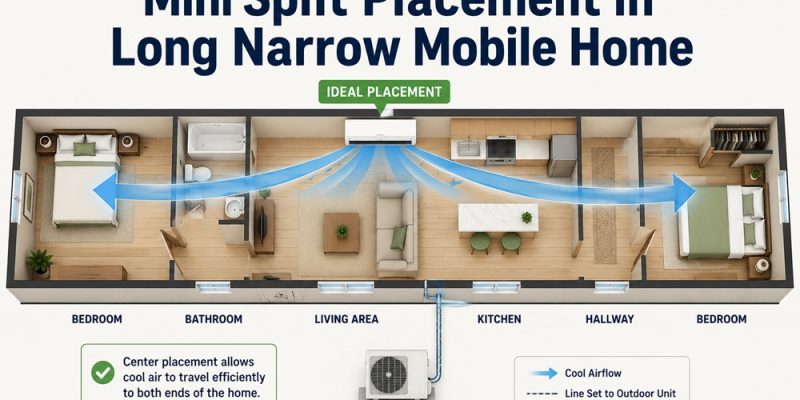
Mini split heads throw air in a fan pattern, and they are happiest conditioning a roughly square open area. A single-wide is the opposite: 14 feet wide and 60 to 80 feet long, often chopped into rooms by walls and a central hallway. Air from one head loses energy and temperature as it travels down that long axis, so the room with the head gets cold and damp while the far rooms barely change. The solution is not a bigger head — that just overcools the near room — but better placement and, usually, more than one zone.
How many heads (zones) do you need?
Think in zones, not square footage alone. A practical starting point for common layouts:
| Home / layout | Typical zoning | Notes |
| Small single-wide, open plan | 1 head, well-placed | Workable only if the layout is genuinely open |
| Standard single-wide (14×70) | 2 heads | One living/kitchen, one bedroom end |
| Long single-wide, many rooms | 2–3 heads | Add a head for a far bedroom or office |
| Double-wide | 2–3+ heads | Often one per section plus bedrooms |
A multi-zone (multi-head) system on a single outdoor condenser lets you condition each zone independently, which is exactly what a chopped-up narrow plan needs. The cost of an extra head is far less than the daily annoyance of a home that is never evenly comfortable.
Where to mount each head
Placement is about throwing air the length of the home and avoiding short-circuiting (air returning to the unit before it does any work):
- Mount high, about 6 inches below the ceiling. Mini splits are designed to draw return air from up high and blow conditioned air down and out.
- Aim along the long axis. Place the living-area head on an end wall or interior wall so its airflow runs down the hallway toward the rest of the home, not across the narrow dimension into a wall a few feet away.
- Put a head where people are, but not where it blows directly on them. Above a doorway or on the wall facing the room’s length usually beats a wall right behind a couch.
- For bedrooms, a dedicated head or a slim ducted/concealed unit keeps doors-closed comfort without blasting one wall.
Interior wall vs. exterior wall
Unique practical insight: in a mobile home, mounting heads on interior walls is often easier and cleaner than exterior walls, because the thin exterior walls and the chassis make running and sealing the line set through an outside wall awkward, and an exterior penetration is one more hole to weatherproof in an already leak-prone shell. An interior wall placement, with the line set routed to a single well-sealed exterior penetration, keeps the envelope tighter and gives you more freedom to aim the air down the length of the home. Plan the line-set route before you pick the wall.
Outdoor unit placement
The condenser location matters for both performance and longevity:
- Set it on a stable pad or wall bracket, clear of skirting that would block airflow, and high enough to stay above snow line in cold regions.
- Keep the line-set run short and within the manufacturer’s maximum length and lift; long runs lose capacity.
- Avoid tucking it in a tight corner of the skirting where heat (in cooling) or defrost ice (in heating) cannot dissipate.
- Give defrost meltwater a place to drain in winter so it does not build an ice pad under the unit.
Do / don’t for mobile-home mini splits
- Do size each zone to its load and choose a cold-climate model if you heat with it.
- Do aim airflow down the long axis and mount heads high.
- Don’t rely on a single center head to condition a long single-wide evenly.
- Don’t oversize a single head to “force” air to the far rooms — it just overcools the near room and short cycles.
- Don’t block the indoor or outdoor unit with furniture, curtains, or skirting.
Frequently asked questions
| Can one mini split heat a whole single-wide? Only if the layout is genuinely open. In a typical single-wide chopped into rooms along a hallway, a single head leaves the far rooms uncomfortable. Two zones — one for the living end, one for the bedroom end — is the reliable answer. How high should the indoor head be mounted? About 6 inches below the ceiling. Mini splits draw return air from up high and blow conditioned air down and out, so a high mount on a wall facing the length of the home gives the best throw. Should heads go on interior or exterior walls? Interior walls are often the better choice in a mobile home: the exterior walls are thin and the chassis complicates the line set, and fewer exterior penetrations means a tighter, easier-to-weatherproof shell. Route the line set to one well-sealed exterior point. Will a mini split work in winter here? A cold-climate (inverter) mini split heats efficiently well below freezing, but check its rated output at your design temperature and size each zone to its load. In severe cold, plan for the capacity drop the same way you would with a central heat pump. Where should the outdoor unit go? On a stable pad or bracket clear of skirting, with a short line set, good airflow around it, and drainage for defrost water. Keep it above the snow line in cold regions so it does not get buried or ice up. |


Comments